Avatar & Signatures Shop

!! Post All Tutorials/PSD/Help/etc !! - Page 2

pancakes thumbnail
Anniversary 12 Thumbnail Group Promotion 5 Thumbnail + 7
Posted: 10 years ago
can someone provide tutorials for gimp

Created

Last reply

Replies

1042

Views

168699

Users

196

Likes

3918

Frequent Posters

incognito. thumbnail
Anniversary 11 Thumbnail Group Promotion 5 Thumbnail + 5
Posted: 10 years ago
How to create  selective coloring
Hey People (: This is my second tut. I was just playing with Photoshop and came to know how to create selective colouring,this is the how I learn things 😆 just keep on photoshoping and you'll be perfect ;)
The tut is very much easy!

Step 1: Make you sig and merge it fully. 
step 2: Duplicate the LAYER and using the animation duplicate the frame as well.
Step 3: Add a black gradient to the SECOND LAYER and make sure that in the first layer doesn't have the gradient on it.
CONFUSED? Let me teach with a screen shot:


*JUST IGNORE THE ANIMATION BAR AT THE MOMENT* Have a look at my layer box,the first layer DOESN'T HAS THE GRADIENT ON IT.
CLEAR ENOUGH? (:

Step 4: Now take the ERASER,choose a small size,starting erasing the part which has the colour which you want to be visible,example in my sig I want jennifer's blouse colour and the lips,I mean the red colour.


*ZOOMED PICTURE*
Step 4: Take the eraser and erase that part,I would adivce you to zoom the siggy because many times the part are too small,it will help you.Erase all the parts with that particular color and you are done :D

This is how my sig came out to be:


^I have made it in an animated way,you can make it non animated as well by merging both the layer once you are done with the erasing!

P.S: This is how I have learned myself,there might be anyother way to do it (:
P.S: It is not important to have the animation bar,I used it because I wanted an animated sig.

ANY HELP NEEDED?DO ASK ME (:

Love,
Somi
...shruti... thumbnail
Anniversary 12 Thumbnail Group Promotion 5 Thumbnail + 4
Posted: 10 years ago
well i made one here it is


Trouble. thumbnail
Anniversary 12 Thumbnail Group Promotion 6 Thumbnail + 3
Posted: 10 years ago
Tutorial
by me
Selective Colouring
I was trying to follow some tutorials on Tumblr but they were kinda complicated ,so just thought to play around and I got to know,how to do Selective colouring. This is the easiest way,for me atleast😆


1.Open the picture in PS and make sure you have the colour in your picture with which you want to stand out.I've taken Green here^^

2.Go to Image>Adjustments>Hue/Saturation or the round thing in the area I've put a box around> Hue/Saturation.

3.Once you've clicked on Hue/Saturation,a box appears.Play with the options above the Hues option ( The one where Yellow is selected as the option)

4.And make the Saturations to 0,as shown in the image.

5.Go to the colour panel(below Hues,Saturation and Lightness) and select the colour which you want to stand out.

Step 4 & 5 can be down the other way around too.

And your selective colouring is doneLemme know if you have any doubts regarding the above :)


.dream-catcher. thumbnail
Anniversary 13 Thumbnail Group Promotion 6 Thumbnail + 6
Posted: 10 years ago
Untolddreamx thumbnail
Posted: 10 years ago
Thanks so much for making this wonderful thread for us.and i love each and every tuts that are posted here.
Mohabbateinn thumbnail
Anniversary 12 Thumbnail Group Promotion 6 Thumbnail + 5
Posted: 10 years ago
My first tutorial !!!

Want to learn how to make this in less than 2 minutes?
watch in HD, and FULLSCREEN!!

How to make Sparkling Glitter Animated TEXT

 
Edited by -Vanshikaa- - 10 years ago
jony4fun thumbnail
Posted: 10 years ago
great tuts... they are helpful to newbies :)
Trouble. thumbnail
Anniversary 12 Thumbnail Group Promotion 6 Thumbnail + 3
Posted: 10 years ago

Tutorial
As Nelo had asked me on a tut for merging pics or rather make a sig in Photoshop CS5,I made a tutorial.So here's a quick one.

To make something like this

Go to File >New.A box will appear,fill in the height & width[take 500*350?]. And then.open the pictures you want to make the signature with.

We need to erase the part to merge both the pictures.

Use the eraser too[Marked] & erase the part.

Add more pictures if you wanna & then do the same thing with the rest[erase :P]
Add textures/PSDs to make it look beautiful [LOL! :P]

incognito. thumbnail
Anniversary 11 Thumbnail Group Promotion 5 Thumbnail + 5
Posted: 10 years ago
How to add motion Blur to Gifs.

I saw this amazing tut on tumblr and I loved it and its totally amazing and helpful! I thought of sharing it with you people 

P.S: THIS TUTORIAL ISN'T MINE! CREDIT GOES TO THE ORIGINAL OWNER.

This is the end result! 

how to make something like this [x]

this is my end result:

note: this isn't a basic gif tutorial so if you don't know how to make gifs, make sure to learn before trying to do this

step 1: make your gif 

step 2: once you have your gif ready add 3 frames onto the gif and duplicate the last layer of your gif 3 times -make sure that for the first added frame the first duplicated layer is visible, and same for the second and third

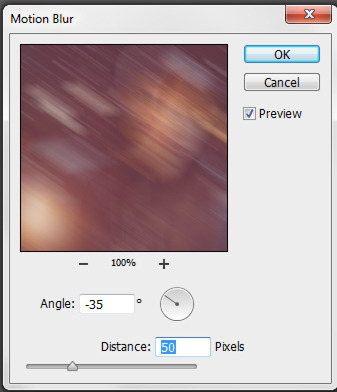
step 3: next you need to add motion blur to the 3 added layers. select the first frame and the first duplicated layer and add a motion blur. i used these settings:

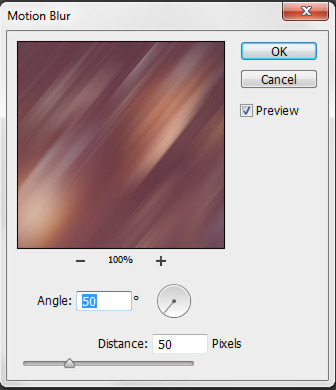
step 4: do the same thing as the previous step, select the second frame and layer and add motion blur but this time it will be different settings. i used this:

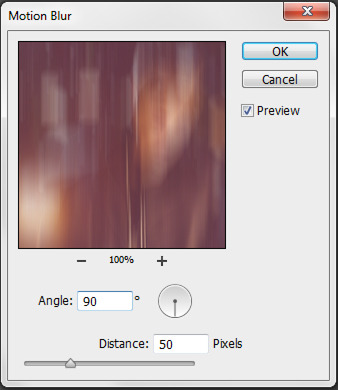
step 5: again you do the same for the last frame and layer. these were my settings:

and you're done. very simple.

please like/reblog this post if it helped you. i'm always open to make any other tutorial so don't hesitate to ask me if you need help :)

NOTE:

  • you don't have to use the same settings i have, you can make the distance further if you like and you can change the angle
  • if you want the motion blur effect to go slower/faster just change the speed of those 3 frames to your liking
Edited by .Enigma. - 10 years ago